
The Advantages of Using Wood Siding Over Other Materials
Looking for a classy and durable look and feel for the exterior of your home? Then installing wood siding could be the best option to choose.
Choosing the right siding type and material is an important decision to make as it defines the overall appeal and feel of your home. This is the reason, you should consider the available options prudently and choose the siding material that suits the overall look of your home, aesthetic, maintenance, and most important your budget. If you want to give your home a rustic, sleek, and modern look, you can explore the infinite colors and finishes of wood siding available. It can also tie into your interior design if you have have a custom live edge dining table or other natural wood features inside of your home.
Since wood siding is known for requiring more attention, maintenance, and painting to protect it from damages, the benefits of choosing wood siding over other materials are myriad. Here is how the beauty of the real wood adds more value and character to your home while protecting your home from extreme weather conditions.
Enhanced Beauty with Sustainability
As sustainability is very much important in daily living, people look for more sustainable remodeling options for their personal properties. And wood is a highly sustainable and renewable source to make it the best and most environment-friendly siding material. For instance, cedar siding is one of the most commonly used types of siding and doesn’t require much treatment, processing, and maintenance. It is more durable than other woods like pine and is totally recyclable. Wood is an environmentally conscious material that gives your home a natural look. Whether you are about to get storm restoration work done or just want to give your home a new classy look, choosing wood as a siding material makes sense.
Make the Exterior of Your Home Stand Out
From modern to rustic, wooden siding can add more character and value to any home style. You can explore a variety of colors, styles, textures, and finishes to choose the best option that suits the overall layout and style of your home. Furthermore, you can also paint or stain wood siding every couple of years to change the look of your home without spending much. As you can buy high-quality wood material for your home siding, it can significantly increase the value of your home.
An Environmentally-friendly Option
If you want an environment-friendly siding material for your home, then nothing is better than wood. Installing wooden siding poses no hard or damage to the houses and properties around. Wood is also very easy to decompose. It spoils in nature automatically and then can be used in manure and fertilization. As there are different materials available for siding installation like vinyl, they are not so environment friendly. And if you are about to choose wood siding, then you are taking your part in doing good for nature and the environment.
Easy to Repair
Wood siding is always easy to repair. It is made of wooden blocks and if a hole is found in any block or any part, it can be fixed with putty in a matter of moments. Wooden siding is also installed using screws that one can easily tighten to keep it in good condition. If there is a problem with one block or a part of the siding is spoiled due to storm damage MN, the woodblock can easily be replaced. This makes repairing wood siding easier and more effective than other types of siding materials.
Excellent Insulation
Wood comes with great insulative features to help you a lot in energy saving. Wooden siding stops heated air from escaping to keep the interior of your home warm in winters. Similarly, conditioned air is also remained cooler for hours in summer. Wood like cedar also helps you protect the structure of a home from heat, cold, and dryness. Siding made of wood can last longer for many decades if maintained properly.
Durability for Wooden Siding
The durability and longevity of wood siding are undeniable. You can find high-quality wood in the market for your home siding to keep it strong and sturdy for many years. If you maintain and take care of your siding once every five years, the life and durability of the siding can be doubled. The durability of the siding also depends on the material to be used, so always choose high-quality material and hire a reliable siding contractor to get the siding installation work done effectively without compromising the quality. By doing so, you can keep the siding in tip-top condition for more than 30 years.
Best Wood for Siding?
As it is great to have a wide variety of options to choose from, choosing the right option can also be overwhelming and difficult. When it comes to choosing the best wood as a siding material for your home, pine, cedar, mahogany, and redwood are some popular options around the world. While all of them are widely used for siding across the globe, the original mahogany is the best one according to experts. its resistance to atmospheric changes and moisture makes it a perfect choice for home siding. Furthermore, a variety of stylish options also give your home a classy and modern look while maintaining a classic touch. It is the right fit for any home style.
Versatility
Siding material in the form of wood comes in a wide range of styles and colors. Homeowners can choose wood siding between shingles, woold lap, and clapboards to give the home exterior an excellent and durable look. Whether you want to give the siding of your home a boost in protecting extreme weather conditions or just want to add a charming feel, you can have endless options to choose from.
Conclusion
As siding installation can be an expensive home renovation or restoration project, you should always choose high-quality material and professional siding contractors to get the wood siding installed properly. You can schedule a call with the AtoZ construction team to get an expert opinion and assistance regarding siding installation or any other home renovation and restoration projects.
What to Do When Your Roof Leaks During a Storm
Have you ever wondered what to do if your roof is leaking during a storm? It’s a question many homeowners find themselves asking during inclement weather.
Your roof is one of the most important parts of your home. It protects you from the elements and keeps your family safe. That’s why you should take action when it starts leaking during ice and snow storms.
Storms can damage your home quite badly. Water alone can cause extensive damage to your home, both inside and out. Fortunately, there are a few things you can do to prevent further damage. Here’s what to do when your roof leaks during a storm.
Act Quickly
If you need to know what to do if your roof leaks during a storm, act quickly. Storms can cause incredible damage. If you see signs of a leak-whether you have a roof leak during an ice storm or your roof is leaking after an ice storm- take fast and decisive action. The longer you wait, the more damage the leak will cause. Not to mention, water can quickly spread throughout your home and cause additional damage. While everyone should know some basic emergency roof repairs, you may need to bring in an expert.
Protect the Interior of Your Home
Once you’ve noticed your roof is leaking during a storm, take steps to protect the interior. Move any valuables or sensitive items out of the way of the leak. Remove things such as:
- Paintings
- Electronics
- Important documents
Allowing interior items to become soaked can cause irreparable damage. Long-term damage may include mildew and mold. In addition, it’s a good idea to put down towels or other absorbent materials to help soak up any water that does make its way inside.
Ease Water Pressure on Your Ceiling
If your roof leaks during a storm, and your ceiling sags or shows signs of water damage, act fast to prevent further damage. One way to ease the pressure on your ceiling is to cut a hole. Doing so will help release some water and prevent your ceiling from collapsing.
You can accomplish this by using a utility knife or a saw. Be sure to cut away from any beams or supports. Once you’ve made the initial cut, you can use a piece of plywood or another board to create a larger opening. A screwdriver works well for this purpose.
Don’t create a large hole! Make it big enough to allow water to drain out but small enough that it won’t cause further damage. Use a bucket to catch any water that drains out and then empty it as needed.
Of course, this is not a permanent solution. It will buy you some time until a professional can come and take a look at the damage.
Look for the Source of the Leak

Once you’ve determined what to do if your roof leaks during a storm, turn indoors. After protecting the interior of your home, it’s time to start looking for the source of the leak. It isn’t always an easy task, especially if the leak is small.
The best place to start looking for leaks is in your attic. Look for any signs of water damage, such as stains on the ceiling or walls.
Another good place to look is around windows and doors. Gaps or cracks in these areas can often provide clues about the leak.
If you don’t have an attic, you can try to locate the source of the leak by going outside and inspecting your roof. Once you’ve found the source of the leak, it’s time to take action.
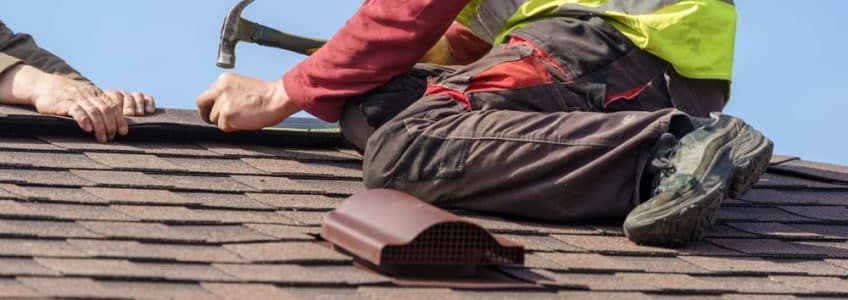
Tarp Your Roof
If your roof leaks during a storm, you need to protect it. One way to prevent further damage from a roof leak during an ice or snow storm is to tarp the roof. It will help keep water from coming into your home and causing additional damage. You can purchase a tarp at most hardware stores.
Some types of storms make climbing up onto the roof too dangerous. For example, if you discover a roof leak during an ice storm, you shouldn’t climb up on your roof. If you discover a roof leaking after a snow storm, it will be safer to go and inspect the roof.
Either way, you can use temporary tape or caulking instead of a tarp. These tools will close any gaps and prevent water from entering.
Take Photos for Insurance Documentation
One of the most important things to do if your roof leaks during a storm is to document the damage.
If there is damage to the interior or exterior of your home, take photos for insurance and roofing warranty documentation. The images will help support any claims you need to file with your insurance company. Take pictures of any damaged items as well as the source of the leak if your roof leaks during a storm.
Determine if Your Insurance Company Covers Water Damage
Depending on the type of insurance you have, your coverage may cover damage caused by a roof leak. Most homeowners’ insurance policies cover water damage caused by severe weather. However, they typically don’t cover damage caused by a lack of maintenance even if your roof leaks during a storm.
If you’re not sure whether your policy will cover the roof leak, contact your insurance company.
Call a Professional Roofing Company
Still wondering what to do if your roof leaks during a storm or if your roof is leaking after a snow storm? Once you’ve taken all the necessary steps to prevent further damage, it’s time to call a professional roofing company. A professional can assess the damage and make any necessary repairs.
Keep in mind that repairing a roof leak after a snow or ice storm is not always a quick and easy process. In some cases, the damage may be extensive, and you may need to replace your roof entirely.
Continue Regular Roof Maintenance
After repairing your roof if your roof leaks during a storm, you should continue regular maintenance. Taking this action will help prevent future leaks and other damage. Be sure to have your roof inspected at least once a year.
You should also clear away any debris that accumulates on your roof. Objects like leaves and branches can cause water to pool on your roof. Debris can lead to leaks and other damage.
If you live in an area with severe weather, you may need to take additional steps to protect your roof. For example, you may need to install hurricane straps or tie downs. These tools help keep your roof secure during high winds.
By taking these precautions, you can help prevent future roof leaks during a storm or going through a stressful time during a heavy storm.

Final Thoughts
Now you know what to do if your roof leaks during a storm. Don’t wait to take action. Use these tips to prevent further damage and call a professional roofing company as soon as possible. If your roof has started leaking during a storm or you want to speak to an expert about how to prevent this from occurring, A to Z Construction is here for you. Contact us today to talk to a team member!
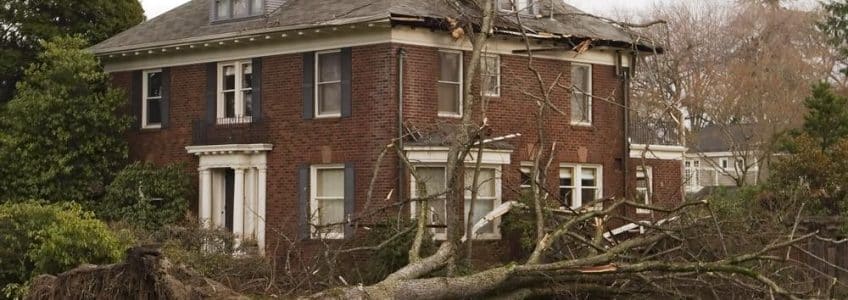
What to Look for When a Storm Damages Your Home
Extreme weather can happen at any moment, leaving your home vulnerable to damage. Unfortunately, homeowners can face costly repairs even without seeing massive destruction to their residences. Inspecting a home for storm damage after severe weather can ensure that unknown problems will not become expensive repairs later.
Performing a Storm Damage Inspection
After experiencing extreme weather, the first thing a homeowner should do is perform a storm damage inspection. This process entails both outside and inside examination to take note of any possible issues.
Some situations that will require you to examine the state of your home for damage include:
- Flooding
- Fallen trees
- Lightning strikes
- Heavy rains
- Flying debris from high winds
- Excessive winds
Knowing what to look for and where to look can save you time and money when you are inspecting a home for storm damage immediately after the event. In addition, the sooner you can determine issues, the quicker you can get to repairs to minimize future problems.
A Step-by-step Guide to Inspecting a Home for Storm Damage

Assessing any damage your home incurred due to a recent storm will indicate what you will deal with for cleanup and repairs. Handling the aftermath of severe weather can be problematic if you don’t know where to start.
Here is a simple step-by-step guide to inspecting your home for storm damage you can follow the next time extreme weather hits.
- Step 1: Make Sure Everyone Is Safe
- Step 2: Look for Harmful Debris
- Step 3: Examine the Roof’s Condition
- Step 4: Look at the Home’s Exterior
- Step 5: Check Out the Windows
- Step 6: Explore for Yard Damage
- Step 7: Check the Air Conditioner and Electrical Appliances
- Step 8: Look for Water Stains or Spots Inside
- Step 9: Examine the Attic, Basement, and Crawl Spaces
- Step 10: Call Your Insurance Company
Step 1: Make Sure Everyone Is Safe
Before heading outside to start looking for storm damage, you want to make sure you and everyone in the home are safe. Broken or fallen power lines can be deadly, so avoid these areas until a professional can secure them.
Step 2: Look for Harmful Debris
Do any trees have broken branches or fallen in your yard during the storm? Often with severe winds, items will blow around and cause damage to nearby structures. A proper storm damage inspection will include debris in your yard or around your home.
Step 3: Examine the Roof’s Condition
Thankfully, you do not have to get a ladder and start climbing your roof. Instead, walk around the outside of your home and look at the roof for debris. See if you notice any missing or broken shingles or areas where they raise up.
If you have a chimney, see if the metal flashing material around it is dented, raised up, or missing.
Step 4: Look at the Home’s Exterior
While inspecting a home for storm damage, see if you have any siding damage or visible problems with your eaves, gutters, and downspouts. Broken or clogged gutters and eaves can cause damage to your home long after a storm if water cannot correctly drain away from your roof.
Step 5: Check Out the Windows
Do you have any broken or cracked windows? Inspect each outside window frame and glass for cracks, breaks, holes, or separation with the edges. These issues can create further problems if water can enter your home due to cracks or gaps between the house’s walls and a window.
Step 6: Explore for Yard Damage
Many homeowners will have other structures in their yard. When inspecting a home for storm damage, examine garden sheds, kids’ playhouses, fencelines, and anything else in your outdoor living space that may have issues.
Step 7: Check the Air Conditioner and Electrical Appliances
If you have an air conditioner for your home, check out the entire unit. Look for broken pieces, disconnected hoses, or leaking water from the unit. Do not operate it until you are sure it is in proper working condition.
Next, examine your electrical appliances in the home. Some major appliances can sustain electrical damage during lightning storms. Check the plugins where they sit for any charring or burnt marks and see if you detect an electrical smell in those areas.
Step 8: Look for Water Stains or Spots Inside
Do a thorough walk-through of your home and examine the walls and ceilings for any water stains or wet spots. These areas can indicate a leak from outside. If you have any roof damage, take extra care to examine the ceiling below those damaged sections.
Step 9: Examine the Attic, Basement, and Crawl Spaces
Many homeowners will overlook their attic and crawl spaces, only checking the basement for flooding. While you must inspect the lower levels of the home, do not forget to check the attic and crawl spaces for signs of water. Often roof damage or cracked siding can leak water into these areas before it reaches inside your home.
Step 10: Call Your Insurance Company

Once you complete your storm damage inspection, take stock of any visible damage your home has, and make a call to your insurance company. Be sure to write down any issues you found and keep records of problems with your home.
Depending on the damage and your insurance company, they may send an adjuster right away.
Inspecting a Home for Storm Damage Is Vital
Navigating cleanup and repairs after a severe weather occurrence can be exhausting and costly, depending on the damage your house suffers. Following this storm damage inspection checklist can help make this stressful situation a little easier for homeowners.
Remember that if you are not comfortable inspecting a home for storm damage or there is a risk of injury due to debris, a call to the professionals is a safe and reliable option. Storm damage experts can assess your property for any possible damage and help get your home cleaned up and back to new quickly. If you need a reliable contractor for your storm damage inspection, contact A to Z Construction today.